Monday, March 5, 2012

Vietnamese Spring Rolls with Garlic Ginger Soy Dipping Sauce


Spring rolls are so fun and so easy to make! They are healthy and light, yet surprisingly filling. The thing you have to watch out for is getting too excited and accidentally overfilling the rice paper wrappers. It's hard not to do this when you have so much good stuff to put in them! It does take some practice to roll them, so don't feel bad if you don't get it right the first (or second, or third..) time. You can find spring roll wrappers in the Asian section of most grocery stores.

I always thought that you were supposed to use warm water to wet the rice paper wrappers when making spring rolls, but I learned recently that this is not true. The rice paper is less likely to tear if you use cold water! You'll have to have a shallow dish filled with water (a pie pan works well). Start by just getting the edges of the rice paper wet and then place the whole wrapper into the water until it is completely covered. Let it sit in the water for just a few seconds. Carefully take it out of the water and place it on a plate.


The possibilities for fillings are endless and can vary depending on your mood or what you have on hand. A genius suggestion by Evan: quinoa! Quinoa is a grain from South America. It is very simple to make, and is very high in protein. It cooks up crunchy with a light, nutty flavor. 

Filling: green peppers, carrots, and cucumber cut into long matchsticks, diced tomatoes, chopped spring mix lettuce, chopped romaine lettuce, cilantro, hummus, and quinoa.

To make quinoa: Boil 1 1/2 cups of water. Add 1 cup quinoa. Cover and simmer for 15 minutes. Remove from heat and let sit for 5 minutes. Fluff with a fork and chill.


Place fillings in the center of the wrapper. Start wrapping from the bottom, fold in the sides one at a time, and then continue rolling like a burrito to finish. Serve with Garlic Ginger Soy sauce.

Garlic Ginger Soy sauce: 3 tablespoons soy sauce, 2 cloves diced garlic, powdered ginger to taste. I also added a pinch of marjoram.

Love cilantro!

Don't overfill the rice paper wrappers or they'll burst!

Have fun and experiment with different flavor combinations. Anything goes, really! :) A few filling ideas for next time: bean sprouts, alfalfa sprouts, Asian vermicelli noodles, cabbage, basil, and mint! Yummy!

Pin It

Saturday, March 3, 2012

Apple Adventures

Every year, my mom orders a ton of fruit from the local FFA kids. Supporting those future farmers! :) Now that she's decided to try some crazy diet that won't let her eat fruit (Mothers, I swear...) she's giving away apples and oranges like it's going out of style. Of course, a lot of those apples come to me. My fruit bowl was full of them, until I decided to get rid of them and make apple crisp for a work party. 


It turned out yummy! Find the recipe I used here! Instead of throwing out the apple cores and peels from the 5 apples I used, I decided to try to make apple jelly.  If you boil apple cores and peels, there is enough natural pectin in the fruit. No need to buy pectin at the store!

First, I threw all the apple cores and peels in a pot and added enough water to just cover them. I brought this mixture to a boil over medium heat. I added about 1/2 teaspoon of cinnamon and 1/4 teaspoon of cloves to the water. Once it was boiling, I reduced the heat and simmered it for 30 minutes (until the apples got soft). My whole apartment smelled like apple cider for hours afterwards. Mmmm! 

Once the apple pieces were soft, I placed a strainer over a bowl and allowed it to strain for about 5 minutes. Then I put the pieces in a plastic bag and poked it with a fork to get the rest of the juices out. You've got to get a little creative in the kitchen! I don't feel like it is necessary to buy all the fancy equipment like a jelly bag or cheese cloth when a plastic bag poked with a fork works just fine ha ha!

Boiling the peels and cores
Straining the peels and cores

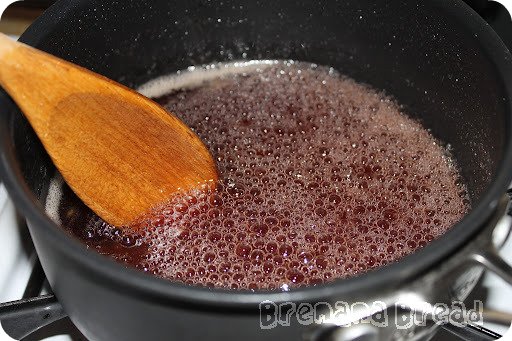
After the straining process was complete, I ended up with about 1 1/4 cup of liquid. I added 3/4 cup of granulated sugar to the mix and let it boil. This is where the fun begins. You have to stir the mixture constantly while it's boiling, otherwise it will burn or bubble over. It takes a while for the mixture to thicken to the right consistency for jelly. 

Stir constantly...

Don't overcook it!

A few of the recipes I found online suggested using the 'spoon test' to test the consistency. This was pretty vague and said that when the liquid 'hangs' on the spoon it has reached the right consistency. A few others mentioned the 'plate test'. This suggests putting a small amount of the liquid on a plate and placing it in the freezer. If you poke at it and the shape of your finger stays set in the liquid, then it's at the right consistency.

I tried to use the methods I just mentioned above. At one point, I thought I had it at the right, but it still seemed a little runny, so I kept cooking it. Oops! I found out quickly that overcooked jelly turns into apple candy.  

It's really too bad I don't have a lollipop mold! I thought it would be fun to try to make shapes, but I ended up just dumping it onto tin foil and doing some swirls ha ha! I just break off pieces when I want some. It melts in your mouth and gets chewy like taffy. Yummy!

Just a reminder that sometimes our adventures in the kitchen turn into fun opportunities! :) 


Apple Candy :)
Pin It

Wednesday, February 29, 2012

Creamy Portabella Mushroom Penne

I love mushrooms. Love them. I love mushrooms so much that I've been known to saute a whole package of them and eat them for a snack. This Mushroom Dill Pasta recipe caught my eye on Pinterest, but I'm not a big fan of dill, so here is my version. It's a quick and easy weeknight meal.


Slice up one package of baby portabella mushrooms, 4 cloves of garlic (I always add more garlic than the recipe calls for...mmm!), and one medium white onion. 


Saute over medium heat in 2 T of olive oil until the mushrooms begin to brown and the onion is soft.


Add 1/2 cup vegetable stock, 1/2 cup half and half, and season with salt and pepper. Simmer over medium heat for about 5 minutes. Meanwhile, cook up 1 1/2 cups of whole wheat penne noodles. Follow directions on the package to cook them. Mine boiled for about 10 minutes before they were 'al dente.' I still don't even know what that means... ha ha! I just keep boiling and checking the noodles every minute or two after they've boiled awhile. You could always try the "throw the noodle against the wall/on the ceiling trick", but I'm pretty sure that is only supposed to work for spaghetti noodles. I remember I used to have a ball with that trick when I was a kid ... I'll let you in on a little secret: I still use it today and smile each time I do. :)


I added about a teaspoon each of basil, oregano, and parsley. 


Sprinkle with Parmesan cheese and enjoy! Makes enough for about 4 people. :) 


Pin It

Monday, February 27, 2012

Banana-Oat Pancakes (Inspired by Ecuador)


I started to really love banana pancakes after traveling to Ecuador on a service trip with my University. We stayed at a biomarine station in the middle of the rainforest and the cooks there were amazing! Every morning there was fresh fruit juice and many of the mornings we had banana pancakes. So, in honor of Ecuador, my first Brenana Bread blogpost will be about banana pancakes!

Estacion Biologica Congal. 

The bunkhouse where we stayed.

If you're looking for the adventure of a lifetime look into volunteering here. It's amazing. Check out the Congal Biomarine Station Facebook Page. The people are wonderful! Anyway, back to pancakes. It's also imperative, I think, that you listen to Jack Johnson's "Banana Pancakes" while cooking these. I made them for a late breakfast yesterday and decided to add in oats. I think that was a good decision. :)


Ingredients:
1/2 cup skim milk
1/2 cup old fashioned oats (quick cooking will also work)
3/4 cup Bisquick baking mix
1 egg
1 banana

Measure out 1/2 cup of skim milk and add the oats to the milk. Let them soak in the milk for about ten minutes so they get soft. Measure out 3/4 cup of Bisquick into a bowl.


Combine all ingredients and add chunks of banana. I use a spoon to make the chunks and then use a fork to mash them into the mixture. It's okay if it's a little lumpy.

Cook over medium heat.
Cook until the edges begin to look like they're set. Little bubbles will start forming in the batter.

Check for golden brown color and flip it!


The chunks of banana get ooey gooey and cook up perfectly. Every once in awhile you get a chewy bite where you can really taste the oats. Top with some butter and raw sugar and enjoy! The banana makes the pancake sweet enough that you don't need to use maple syrup... unless you want to indulge. :) This recipe makes 3 medium sized pancakes. Keep that in mind if you're feeding a crowd! 
Pin It